Android Fragments Tutorial
Android Fragments
Android Fragment is the part of activity, it is also known as sub-activity. There can be more than one fragment in an activity. Fragments represent multiple screen inside one activity.
Android fragment lifecycle is affected by activity lifecycle because fragments are included in activity.
Each fragment has its own life cycle methods that is affected by activity life cycle because fragments are embedded in activity.
The FragmentManager class is responsible to make interaction between fragment objects.
Android Fragment Lifecycle
The lifecycle of android fragment is like the activity lifecycle. There are 12 lifecycle methods for fragment.
| No. | Method | Description |
|---|---|---|
| 1) | onAttach(Activity) | it is called only once when it is attached with activity. |
| 2) | onCreate(Bundle) | It is used to initialize the fragment. |
| 3) | onCreateView(LayoutInflater, ViewGroup, Bundle) | creates and returns view hierarchy. |
| 4) | onActivityCreated(Bundle) | It is invoked after the completion of onCreate() method. |
| 5) | onViewStateRestored(Bundle) | It provides information to the fragment that all the saved state of fragment view hierarchy has been restored. |
| 6) | onStart() | makes the fragment visible. |
| 7) | onResume() | makes the fragment interactive. |
| 8) | onPause() | is called when fragment is no longer interactive. |
| 9) | onStop() | is called when fragment is no longer visible. |
| 10) | onDestroyView() | allows the fragment to clean up resources. |
| 11) | onDestroy() | allows the fragment to do final clean up of fragment state. |
| 12) | onDetach() | It is called immediately prior to the fragment no longer being associated with its activity. |
Android Fragment Example
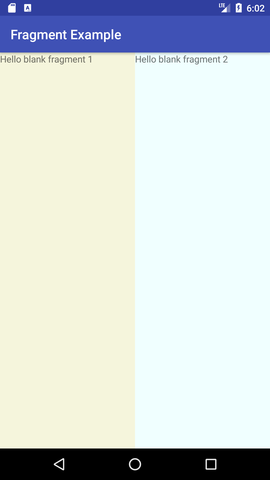
Let’s have a look at the simple example of android fragment.
activity_main.xml
File: activity_main.xml
- <LinearLayout xmlns:android=“http://schemas.android.com/apk/res/android”
- android:layout_width=“fill_parent”
- android:layout_height=“fill_parent” >
- <fragment
- android:id=“@+id/fragment2”
- android:name=“com.example.fragmentexample.Fragment2”
- android:layout_width=“0px”
- android:layout_height=“match_parent”
- android:layout_weight=“1”
- />
- <fragment
- android:id=“@+id/fragment1”
- android:name=“com.example.fragmentexample.Fragment1”
- android:layout_width=“0px”
- android:layout_height=“match_parent”
- android:layout_weight=“1”
- />
- </LinearLayout>
File: fragment1.xml
- <?xml version=“1.0” encoding=“utf-8”?>
- <LinearLayout xmlns:android=“http://schemas.android.com/apk/res/android”
- android:layout_width=“match_parent”
- android:layout_height=“match_parent”
- android:orientation=“vertical”
- android:background=“#00ff00”
- >
- <TextView
- android:id=“@+id/textView1”
- android:layout_width=“wrap_content”
- android:layout_height=“wrap_content”
- android:text=“fragment frist”
- android:textAppearance=“?android:attr/textAppearanceLarge” />
- </LinearLayout>
File: fragment2.xml
- <?xml version=“1.0” encoding=“utf-8”?>
- <LinearLayout xmlns:android=“http://schemas.android.com/apk/res/android”
- android:layout_width=“match_parent”
- android:layout_height=“match_parent”
- android:orientation=“vertical”
- android:background=“#0000ff”
- >
- <TextView
- android:id=“@+id/textView1”
- android:layout_width=“wrap_content”
- android:layout_height=“wrap_content”
- android:text=“Second Fragment”
- android:textAppearance=“?android:attr/textAppearanceLarge” />
- </LinearLayout>
MainActivity class
File: MainActivity.java
- package com.example.fragmentexample;
- import android.os.Bundle;
- import android.app.Activity;
- import android.view.Menu;
- public class MainActivity extends Activity {
- @Override
- protected void onCreate(Bundle savedInstanceState) {
- super.onCreate(savedInstanceState);
- setContentView(R.layout.activity_main);
- }
- }
File: Fragment1.java
- package com.example.fragmentexample;
- import android.app.Fragment;
- import android.os.Bundle;
- import android.view.LayoutInflater;
- import android.view.View;
- import android.view.ViewGroup;
- public class Fragment1 extends Fragment {
- @Override
- public View onCreateView(LayoutInflater inflater, ViewGroup container,
- Bundle savedInstanceState) {
- // TODO Auto-generated method stub
- return inflater.inflate(R.layout.fragment1,container, false);
- }
- }
File: Fragment2.java
- package com.example.fragmentexample;
- import android.app.Fragment;
- import android.os.Bundle;
- import android.view.LayoutInflater;
- import android.view.View;
- import android.view.ViewGroup;
- public class Fragment2 extends Fragment {
- public View onCreateView(LayoutInflater inflater, ViewGroup container,
- Bundle savedInstanceState) {
- // TODO Auto-generated method stub
- return inflater.inflate(R.layout.fragment2,container, false);
- }
- }
Output:
Source : https://www.javatpoint.com/android-fragments